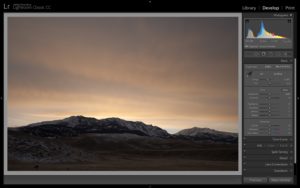
Exposing to the right has two big benefits:
- Reducing noise
- Maximizing dynamic range
“The right” refers to exposing your image brighter so it gets pushed to the right side of the histogram. If you aren’t sure how to read a histogram, it’s basically a chart of every pixel in your image distributed from pure black to pure white. A bright image will have more of the chart data on the right side. A dark image will have more of the chart data on the left side.
Take a look at the histogram (arrow) in this image. Notice how there is very little space between the data and the right side of the histogram. This means there is a lot of data that is just below white.

This histogram is also visible on your camera’s LCD screen, so you’ll be able to check your images right after taking them. You can also use live view mode and display a real-time histogram on some camera models.
HOW DO YOU EXPOSE TO THE RIGHT?
Exposing to the right has to be done in camera, not in post-processing. Even if your image ends up too bright in camera, you’ll be able to darken the image in post-processing and end up with less noise than you would have if you exposed dark in the first place.
The key is to remember to push your exposure to the right side of the histogram without clipping highlights, because those will not be recoverable when you darken the image later. You camera should have an option to show blinking areas on your image where highlights are clipped.
REDUCING NOISE
Without getting too technical, there is more data available on the right half of the histogram, which helps to reduce noise. At the same ISO, a dark image will reveal more noise than a bright image.
If you’re shooting at a high ISO (1600 / 3200) and want to minimize noise, you may need to slow down the shutter speed or open up the aperture in order to expose more to the right. You may not be able to adjust the aperture or shutter speed anymore without getting a blurry photo. At that point, you can try shooting at even higher ISOs (take several shots), intentionally blur the image with slow shutter speeds, or you may just be without enough light to get the shot you want.
If you’re shooting a scene that’s naturally all dark, you don’t necessarily need to expose it to nearly white. Just keep in mind that the brighter you expose it, the less noise you’ll see.
INCREASE DYNAMIC RANGE
Dynamic range is the ratio between the brightest and darkest areas of a scene. A scene with 10 stops of dynamic range means the brightest area is 1,024 times brighter than the darkest area (each stop doubles the amount of light). 10 stops of dynamic range can also be expressed as a contrast ratio of 1024:1. To put it into perspective, the difference between a sunlit area and a shaded area is only four stops (16:1).
If you picture your histogram as the dynamic range of your camera, you’ll realize that utilizing the entire histogram will maximize your available dynamic range. If the brightest area of your scene only reaches the middle of your histogram, you’re losing out on half your dynamic range!
To ensure this image contained the maximum dynamic range, I exposed to where the brightest values were almost touching the right side of the histogram. If you go too far and clip the highlights, they’re blown and you won’t be able to darken them.

This anchors the white point to the right side of the histogram. Everything darker will fall into place. The amount of detail you’ll see in shadows depends on the dynamic range of the scene, and the ability of your camera to capture that dynamic range. The theoretical limit for most DSLR cameras is 14 stops of dynamic range, though it’s typically lower.
[text-blocks id=”4129″]

